Mastering the Node.js REPL, Part Two
In the first part of this series, we have covered the basics of the Node.js REPL. Now is time to learn how to use the programmatic API to transform it into a powerful tool for development.
Building our own custom REPL
Hello, world
We will begin by building a REPL version of a hello world. We can start our greeter loop with just a few lines of code:
const Repl = require('repl');

// Print the welcome message
console.log(`
  Hello, ${process.env.USER}!
  You're running the Node.js REPL in ${process.cwd()}.
`);

// Start the REPL
Repl.start();
That is pretty much self-explanatory. We import the repl node library, print a message, and start the loop. We use the USER environment variable and the current working directory to print a nice message:

Adding some colors
We can highlight some parts of the welcome message to make things easier to read:
const Repl = require('repl');

// Color functions
const colors = {
  RED: '31',
  GREEN: '32',
  YELLOW: '33',
  BLUE: '34',
  MAGENTA: '35',
};
const colorize = (color, s) => `\x1b[${color}m${s}\x1b[0m`;

// Some useful stuff
const user = colorize(colors.MAGENTA, process.env.USER);
const cwd = colorize(colors.YELLOW, process.cwd());
const say = (message) => () => console.log(message);
const sayWelcome = say(`
  Hello, ${user}!
  You're running the Node.js REPL in ${cwd}.
`);

// Print the welcome message
sayWelcome();

// Start the REPL
Repl.start();
We colorized the username and the current working directory to make it look a bit better:

Customizing the prompt
The REPL prompt is just a string that can be passed to the start() function:
const nodeVersion = colorize(
  colors.GREEN,
  `${process.title} ${process.version}`
);
const prompt = `${nodeVersion} → `;

// Start the REPL
Repl.start({ prompt });
Now we have a prompt that shows the node version that we are running:

The exit event
The start function returns the loop server. Using the loop server instance, we can listen to server events like the exit event:
// Our goodbye function
const sayBye = say(`
  Goodbye, ${user}!
`);

// Start the REPL
const repl = Repl.start({ prompt });

// Listen for the exit event
repl.on('exit', sayBye);

Understanding the REPL context
The basics
Let’s say we run our last example in the terminal using the CLI:

As you can see, the variables we defined in our code are not available in our REPL. When we invoke the start method, Node.js creates a new execution context for the REPL. This context is different from where the rest of our code is executed, so we won’t have access to the variables we define in it.
We can define properties in the context by referencing the loop server instance that the start method returns.
const util = require('util');

// Start the REPL
const repl = Repl.start({ prompt });

repl.context.noop = () => {};
repl.context.identity = (x) => x;
repl.context.isString = (x) => typeof x === 'string' || x instanceof String;
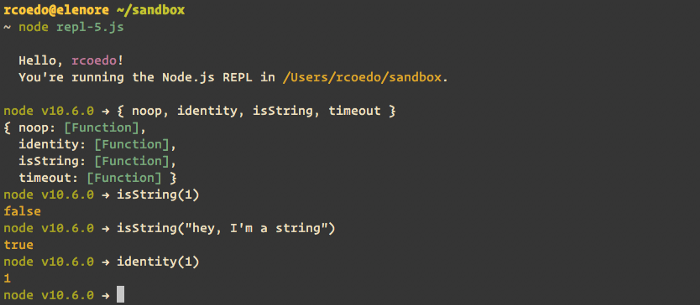
repl.context.timeout = util.promisify(setTimeout);
By defining properties in the server’s context object, we are able to use them within the REPL:

Read-only context
The context properties are not read-only by default, so they can be overwritten if we mess up:

We can define them as read-only using Object.defineProperty():
// Start the REPL
const repl = Repl.start({ prompt });

Object.defineProperty(repl.context, 'noop', {
  configurable: false,
  enumerable: true,
  value: () => {},
});
We could also write a utility function to extend our context easily; It would be something like this:
// Function that takes an object o1 and returns another function
// that takes an object o2 to extend it with the o1 properties as
// read-only
const extendWith = (properties) => (context) => {
  Object.entries(properties).forEach(([k, v]) => {
    Object.defineProperty(context, k, {
      configurable: false,
      enumerable: true,
      value: v,
    });
  });
};

// Start the REPL
const repl = Repl.start({ prompt });

// Extend the REPL context as read-only
extendWith({
  noop: () => {},
  identity: (x) => x,
  isString: (x) => typeof x === 'string' || x instanceof String,
  timeout: util.promisify(setTimeout),
})(repl.context);
After doing this, our context properties cannot be overwritten anymore:

Handling context reloads
The context can be anything we want; for instance, it could hold state. For this reason, it sometimes makes sense to reset the context to its default value.
The REPL command .clear can be used to reset the context. Let’s try it out:

The context is not being appropriately reloaded because we need to listen for the reset event and re-initialize it when the event is fired:
// Context initializer
const initializeContext = extendWith({
  utils: {
    noop: () => {},
    identity: (x) => x,
    isString: (x) => typeof x === 'string' || x instanceof String,
    timeout: util.promisify(setTimeout),
  },
});

// Start the REPL
const repl = Repl.start({ prompt });

// Initialize our context
initializeContext(repl.context);

// Listen for the reset event
repl.on('reset', initializeContext);
The reset listener is a function context => { ... }. It receives the context and does whatever it needs to reset the context.
Now our context is being properly reloaded:

Using the global context
There is a way to force the REPL to use the global context instead of a different context. The default Node.js REPL uses this setting.
Setting the REPL to use the global context can be helpful if you need to define the context before you instantiate the loop server. However, you will lose the ability to reload it:
const Repl = require('repl');

global.noop = () => {};
global.identity = (x) => x;
global.isString = (x) => typeof x === 'string' || x instanceof String;

const repl = Repl.start({ useGlobal: true });

Custom node commands
Another cool trick you can do with it is defining new commands. You can define dot commands using the loop server method defineCommand.
The defineCommand method takes a command name and a { help, action } object:
// Start the REPL
const repl = Repl.start({ prompt });

// Define our custom commands
repl.defineCommand('welcome', {
  help: 'Prints the welcome message again',
  action() {
    this.clearBufferedCommand();
    sayWelcome();
    this.displayPrompt();
  },
});
It’s worth noting that the action function will be bound to the loop server, so we should invoke the server’s functions using the this keyword. Avoid using an arrow function here since they have lexical scope.
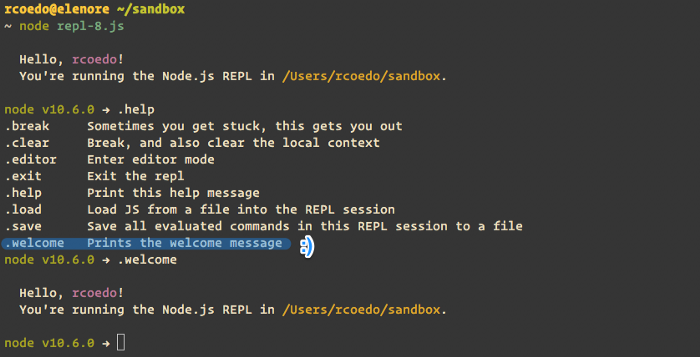
Now that we have defined our command, it will be available within the REPL. We can see it when we invoke .help:

Using the await keyword
Just like we covered in our previous post, we can also run our custom REPL with the experimental await support using the flag --experimental-repl-await:

Wrapping it up once again
In this post, we have covered the basics of the Node.js REPL programmatic API. Our complete code looks like this:
If you made it this far, you might want to play a bit with what you’ve learned today. You can find the complete example for our REPL in this repository.
In the next part of the series, we will make a custom REPL for an actual project.
Stay tuned!
